Modern JavaScript Packaging
Contents

In 2019, Github announced its Package registry for Javascript and few other languages, which means now you can publish and manage your packages on both Github and NPM and use any package manager client. Through this blog, I will try to explain how you can do it, and by the end, you will know everything to build and publish your package to any registry, Github, or NPM.
If you are familiar with npm or package building, you can jump directly to the publishing part.
Packages and Registry
A package is a piece of software that is Independent, reusable, and distributable. In Nodejs, each file is treated as a separate module, and a package is made of one or one or more modules, and it might or might not depend on other packages.
Registries stores all the packages and their different versions; they are used to distribute packages via a Package manager. Following are the registries for Javascript Packages:
- NPM Registry: registry.npmjs.org
- Github Registry: npm.pkg.github.com
Package manager
A package manager is used to install, delete, and manage packages. It searches for the package you are looking for and installs it in the node_modules. It serves as a client for the registry and helps you interact with it. The tree major package managers for Javascript are:
npm: It is the default package manager created in 2009; it communicates with the registry and works as the interface for it.
yarn: It is the most popular alternative; it supports offline cache, Deterministic Installs, License Checks. That makes it secure, fast, and reliable.
pnpm: It is known for saving disk space by storing one package version just once on the system, and it is faster than npm.
Example
For this blog, we will create a tiny and simple package to find the distance between a given point and the origin. I have already published this package, and you can find the source code here.
Initialization Package
We need to create a manifesto file to tell the package manager that a repository is a javascript package, here package.json is the manifesto file. It holds all the crucial details about it, from package name to version, dependencies, etc. To do so, we will create a new folder and initialize npm init, follow the commands given below:
|
|
This will create a file package.json, which should resemble the following file. You also need to fill in the essential details in this manifesto file, like version, description, author, etc.
Here you can keep any package name, but remember Github only supports scoped packages, so the name should be formatted as @owner/name and should contain lowercase letters only, even if your owner name is in uppercase.
|
|
Install Dependencies
We will write our package in Typescript, which is a superset of javascript. The reason for using Typescript are:
- Optional static typing.
- The ability to compile down to a version of JavaScript that runs on all browsers.
To be able to use Typescript, we need to install the typescript module as a development dependency.
|
|
This will create a node_modules directory, which holds all the dependencies for the project. If you open it, you will see Typescript is installed there. It will also create an autogenerate package-lock.json, and it describes the exact dependency tree that was generated.
Configure
We also need to configure the Typescript to use it for our project, and we do it by adding a file tsconfig.json. You can use the configuration given below for this example.
|
|
We also need to configure our package.json to specify the build command and our Github repository. I am assuming you are familiar with Github and can create and push your repository. If you are not, I will suggest you learn about it here.
We need to add the entry point of the package, which is going to be dist/index.js, this file is not present yet, but will be once we build the project. We also need to provide the method to build it, for that we are using tsc(Typescript compiler). We need to provide the Github repository for the project. It is required to publish your package to Github Registry. You also need to add files key to package.json, to whitelist the files or folders you want to publish.You need to add the following lines to your package.json file to add the above mentions things.
|
|
Program
We are going to write an elementary program for this example. It’s going to be functional. However, this program is practically useless and is just for demonstration, in the working world, you will be expected to create better and useful packages. This program can be used to find the distance between the given point and the origin. Create an index.ts file the ‘./src’ folder and write the following program init.
|
|
So far, this is how your file structure looks like. If you run npm run build, it will also create the dist/index.js, which is the compiled program and is the entry point.
|
|
Publishing
We have a package that we want to publish to the NPM registry or Github registry. We start by authenticating, which is a little different for NPM and Github.
NPM
Authenticate
You need to sign up at npmjs.com and use those credentials to log in to npm client.
|
|
Publish
Now we can publish our package; to do so, use the following command.
|
|
We are using --access because since scoped naming for packages is usually used for private packages in NPM, so to bypass that, we need to specify that our package is to be public.
Install
To Install packages from NPM registry, users can directly use the package name as shown below:
|
|
Un-Publish
Unpublishing your package is not recommended. Instead, you can depreciate it.
According to the unpublish policy of NPM, you can’t unpublish a version after 24 hours of publishing it, and you can’t unpublish a package after 72 hours of publishing and only if there are no dependents on it. Before that, to un-publish a package, you can run the following command.
|
|
Github
Generating Token
To authenticate with Github, we need to generate a personal access token. You do that by first logging into your Github account, then go to Settings -> Developer settings -> Personal access tokens. Click on Generate new token. You will be asked to provide a note(name) for the token.
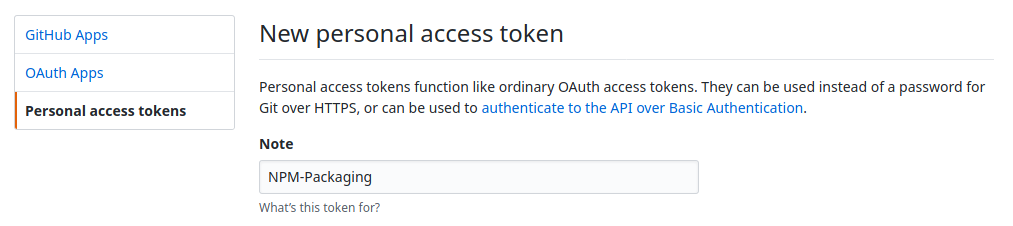
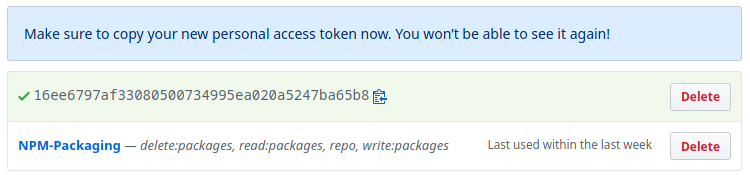
And select the write:packages permissions for it and click on the Generate token button on the bottom of the page.

This will generate a token for you, which you should save to a safe place as you are going to see it just once.
Authenticate
There are two ways to authenticate now:
- By adding your access token to your ~/.npmrc file.
- By logging in to npm with your access token.
I am a little opinionated here, and I like the second method because and I am going to use that for this blog. In the first one, there are chances of the file getting committed if you backup your dotfiles, and In case you lose your token, you can always generate it back and log in again.
To authenticate, we can generate the token and login to the Github registry. We do so by following the commands given below.
|
|
Publish
The package is ready, and we are authenticated to publish the packages. There are two ways to publish your package.
For this blog, we are going to use the second method; however you can use any method. The only reason for this decision is that I want to avoid creating one more file. Open your package.json file and add publishConfig section to it.
|
|
Now we can publish our package; to do so, use the following command.
|
|
Install
To use any package published on Github, users need to add it to their projects .npmrc file, create this file if it doesn’t already exist. They need to specify GitHub Packages URL and the account owner. For multiple owners, you need to specify multiple GitHub Packages URL.
|
|
After this, you shall be able to download the packages.
|
|
Un-Publish
You can’t delete an entire public package or specific versions, Github restricts that to avoid breaking projects that may depend on that package. You can, however, delete private packages. To do so, you can use the command given below.
|
|
Conclusion
I hope this blog was helpful, and after reading this, you feel a little confident about creating your package and publishing it. I suggest you read more about it from the links I have provided throughout the blog, and you can also look at the source code and the published package.
If you like this blog, do follow me on twitter and share this blog.
Video
Acknowledgement
- Hero image by Kristina Paparo on Unsplash